Very often I find myself buying something, only to find that I already have a pack or two of it at home. Then, after stuffing as much of it as I can into the freezer, I try to find ways of using up what remains. It is while trying to use up some(well, a lot, actually) of rice flakes/poha, that I chanced upon a recipe for cutlets made out of rice flakes. The recipe is modified from Tarla Dalal's "Iron Rich Recipes".
What you need:
Rice flakes - 1 cup
Green gram dal - a handful
Green chilli - as many or as few as you like
Salt
Garam masala
Potato - 1, boiled, peeled and mashed
Turmeric powder - 1/2 tsp
Chopped corriander
Soak the rice flakes and dal separately in water for atleast 30 minutes. I used matta rice flakes which handle soaking pretty well. However, if you are using a thinner variety, I would suggest just washing it thoroughly until wet through and not soggy.
Drain off all the water and grind the rice flakes (after squeezing out as much moisture as you can out of them) and dal coarsely in a blender. Mix in the other ingredients. Shape it into small balls and flatten them between your hands. Now heat a shallow frying pan (I used my microwave), arrange the cutlets on it, drizzle some oil over it and fry until crisp and brown on both sides.
Serve with some ketchup or as is.
I do not have any pics of the cutlets as we finished them before I could click any.....will update the next time I make these.
Check out the blogging marathon page to see what my fellow marathoners are cooking.
Thursday, July 21, 2011

Wednesday, July 20, 2011
Quick and easy masala chana/chick peas
One of the recurring themes in my blog is quick and easy recipes. I had soaked black chana in the morning with the intention of making my usual kadala curry to go with aapam. However, as I was looking through my cookbooks, wondering what else I could make for the blogging marathon, I chanced upon this recipe in Mallika Badrinath's 100 Vegetarian Gravies. As the name suggests, it is easy to make - and is cooked entirely in one pot, which makes cleaning that much easier.

What you need:
Black chana/chick peas - 1 cup, soaked in plenty of water for 10 hours. (The original recipe uses white chick peas, but since I had already soaked these, I used them)
Cardamom - 3
Cloves - 5
Cinnamon - a small piece
Oil/ghee - 2 tbsp
Salt - to taste
Grind together:
Onion - 1
Tomato -2
Garlic - 5 or 6 cloves
Ginger - a 2 inch piece
Red chilli powder - 1 tsp
Corriander - 1 small bunch
Cumin seeds - 1 tsp
Black peppercorns - 1/4 tsp
Heat oil in the pressure cooker. Add cardamom, cinnamon and clove. Add the ground mixture and fry on a low flame until oil separates. Add chick peas, sufficient water and salt and cook until one whistle. Then lower the heat and cook for another 10 minutes.
Serve hot.
Check out the blogging marathon page to see what my fellow marathoners are cooking.

What you need:
Black chana/chick peas - 1 cup, soaked in plenty of water for 10 hours. (The original recipe uses white chick peas, but since I had already soaked these, I used them)
Cardamom - 3
Cloves - 5
Cinnamon - a small piece
Oil/ghee - 2 tbsp
Salt - to taste
Grind together:
Onion - 1
Tomato -2
Garlic - 5 or 6 cloves
Ginger - a 2 inch piece
Red chilli powder - 1 tsp
Corriander - 1 small bunch
Cumin seeds - 1 tsp
Black peppercorns - 1/4 tsp
Heat oil in the pressure cooker. Add cardamom, cinnamon and clove. Add the ground mixture and fry on a low flame until oil separates. Add chick peas, sufficient water and salt and cook until one whistle. Then lower the heat and cook for another 10 minutes.
Serve hot.
Check out the blogging marathon page to see what my fellow marathoners are cooking.
Tuesday, July 19, 2011
Amritsari sookhi dal
To me, a dal that you eat with roti has always been a wet curry. Though I have heard of sookha dal, the concept was unimaginable to me. Until today, that is. When I chanced upon Sanjeev Kapoor's "Dal Roti", the picture of this dal tempted me enough to make me try it out at home. Now that I have made it, I can say that not only does it look good, it tastes quite hearty and good too.

What you need:
Split urad dal - 1/2 cup
Turmeric powder - 1/2 tsp
Ginger - a 3 inch piece, julienned
Oil - 3 tbsp
Asafoetida - a little
Cumin seeds - 1 tsp
Onion - 1, chopped fine
Green chilli - 2 or 3, minced
Tomato - 2, chopped
Red chilli powder - 1 tsp
Garam masala - 3/4 tsp
Corrinder leaves - to garnish,chopped
Amchur powder - 1 tsp (the original recipe calls for lemon juice)
Wash the dal well. Take it in a deep dish. Add 3 cups of water, salt, turmeric powder and half of the ginger. Let it come to a boil. Then reduce flame and simmer until just done.
While the dal is getting cooked, heat oil in a pan. Add cumin seeds, asafoetida and onions. Saute until onions turn pink. Add the remaining ginger, green chillies and tomato. Saute for a minute or two. Add red chilli powder and heat till oil separates.
Now drain all the excess water from the cooked dal and add it into the pan. Mix well. Add garam masala, salt if required, amchoor powder and corriander leaves. Mix well and heat for 2-3 minutes.
Enjoy!!!
Check out the blogging marathon page to see what my fellow marathoners are cooking.
This goes to Priya's bookmarked recipes event.

What you need:
Split urad dal - 1/2 cup
Turmeric powder - 1/2 tsp
Ginger - a 3 inch piece, julienned
Oil - 3 tbsp
Asafoetida - a little
Cumin seeds - 1 tsp
Onion - 1, chopped fine
Green chilli - 2 or 3, minced
Tomato - 2, chopped
Red chilli powder - 1 tsp
Garam masala - 3/4 tsp
Corrinder leaves - to garnish,chopped
Amchur powder - 1 tsp (the original recipe calls for lemon juice)
Wash the dal well. Take it in a deep dish. Add 3 cups of water, salt, turmeric powder and half of the ginger. Let it come to a boil. Then reduce flame and simmer until just done.
While the dal is getting cooked, heat oil in a pan. Add cumin seeds, asafoetida and onions. Saute until onions turn pink. Add the remaining ginger, green chillies and tomato. Saute for a minute or two. Add red chilli powder and heat till oil separates.
Now drain all the excess water from the cooked dal and add it into the pan. Mix well. Add garam masala, salt if required, amchoor powder and corriander leaves. Mix well and heat for 2-3 minutes.
Enjoy!!!
Check out the blogging marathon page to see what my fellow marathoners are cooking.
This goes to Priya's bookmarked recipes event.
Monday, July 18, 2011
More urundai kuzhambu(Steamed lentil balls in yogurt gravy)
A gravy made of buttermilk is standard fare in any South Indian home. It goes by the name of more kuzhambu in Tamil Nadu, moru kari in Kerala and majjige huli in Karnataka. The usual version that I make with ripe plantain or colocasia or ash gourd is posted here.
This version is made using steamed balls of tuar dal. I first tasted this at a restaurant in Chennai and quite liked the aroma and the taste of it. Today, with the help of Mallika Badrinath's recipe from her book Classic Lunch Recipes, I have been able to recreate a remembered taste.

What you need:
For the urundai/koftas
Tuar dal - 1/2 cup(scant)
Whole white urad - 1 tbsp
Green chillies - 2 or 3(adjust to taste)
Onion - 1 small, chopped very fine
Chopped corriander leaves - a few
Cumin seeds - 1/2 tsp
Salt - to taste (use a little less than you normally would as the gravy too has salt)
For the kuzhambu/gravy
Sour thick curd - 2 cups (beaten lightly to break up lumps)
Turmeric powder - 1/2 tsp
Salt
Grind together:
Fresh grated coconut - 1/4 cup
Green chillies - 2 or 3
Coriander seeds - 1.5 tsp
Cumin seeds - 1/2 tsp
Tuar dal - 1 tbsp
For tempering:
Oil - 1 tsp
Mustard seeds - 1/2 tsp
Red chillie - 1, broken
Methi seeds - 1/4 tsp
Curry leaves - a few
To make koftas/urundai:
Soak the dals together for an hour. Drain all the water. Add in all the other ingredients except onion and corrinder. Grind to a coarse paste without adding any water. Mix in the chopped onions and corrainder. Shape into lemon sized balls. Grease an idli plate and stem for 8-10 minutes. Set aside the balls to cool.

To make kuzhambu:
Soak all the ingredients listed under Grind together, except coconut in just enough water to cover for at least 30 minutes. Add coconut and grind to a smooth paste.
Transfer this to a pan. Add 1/2 cup of water, salt, turmeric powder and let it boil for a few minutes. Add the whipped curd and boil some more. Just before removing from fire, add the steamed koftas and boil for a minute or two.
Heat the tempering ingredients until the mustard seeds pop. Pour this over the kuzhambu.
Enjoy with rice/idli/dosa.
This tastes even better the next day after the flavours have blended together well.
Today is Day 3 or Blogging Marathon #7, and this is my post under the theme Cooking from cookbooks. Check out the blogging marathon page to see what my fellow marathoners are cooking.
This version is made using steamed balls of tuar dal. I first tasted this at a restaurant in Chennai and quite liked the aroma and the taste of it. Today, with the help of Mallika Badrinath's recipe from her book Classic Lunch Recipes, I have been able to recreate a remembered taste.

What you need:
For the urundai/koftas
Tuar dal - 1/2 cup(scant)
Whole white urad - 1 tbsp
Green chillies - 2 or 3(adjust to taste)
Onion - 1 small, chopped very fine
Chopped corriander leaves - a few
Cumin seeds - 1/2 tsp
Salt - to taste (use a little less than you normally would as the gravy too has salt)
For the kuzhambu/gravy
Sour thick curd - 2 cups (beaten lightly to break up lumps)
Turmeric powder - 1/2 tsp
Salt
Grind together:
Fresh grated coconut - 1/4 cup
Green chillies - 2 or 3
Coriander seeds - 1.5 tsp
Cumin seeds - 1/2 tsp
Tuar dal - 1 tbsp
For tempering:
Oil - 1 tsp
Mustard seeds - 1/2 tsp
Red chillie - 1, broken
Methi seeds - 1/4 tsp
Curry leaves - a few
To make koftas/urundai:
Soak the dals together for an hour. Drain all the water. Add in all the other ingredients except onion and corrinder. Grind to a coarse paste without adding any water. Mix in the chopped onions and corrainder. Shape into lemon sized balls. Grease an idli plate and stem for 8-10 minutes. Set aside the balls to cool.

To make kuzhambu:
Soak all the ingredients listed under Grind together, except coconut in just enough water to cover for at least 30 minutes. Add coconut and grind to a smooth paste.
Transfer this to a pan. Add 1/2 cup of water, salt, turmeric powder and let it boil for a few minutes. Add the whipped curd and boil some more. Just before removing from fire, add the steamed koftas and boil for a minute or two.
Heat the tempering ingredients until the mustard seeds pop. Pour this over the kuzhambu.
Enjoy with rice/idli/dosa.
This tastes even better the next day after the flavours have blended together well.
Today is Day 3 or Blogging Marathon #7, and this is my post under the theme Cooking from cookbooks. Check out the blogging marathon page to see what my fellow marathoners are cooking.
Monday, July 11, 2011
And the winner is......
I used a random number generator to pick the winner of the giveaway......and the winner is Vardhini of Zesty Palette.
Congratulations, Vardhini.
Congratulations, Vardhini.
Friday, July 08, 2011
Five years of blogging and a giveaway
A few days back, my blog turned five years old. To celebrate, I am giving away a book to one lucky winner. I thought long and hard about which book I should give away......and finally decided that there could be nothing better than Cooking At Home with Pedatha - an award winning cookbook authored by Jigyasa Giri and Pratibha Jain.

With over sixty traditional Andhra recipes in it, this book is written in a simple, easy to understand manner, and accompanied by beautiful pictures. Check out the sun dried rice flake fritters(aval vadam) that I made using the recipe from this book.
To win this book, you don't have to follow me or "like" me......though I am assuming that your being here and reading this means that you do like me. All that you have to do is leave a comment telling me why you think you should win this book.
The giveaway is open for a week from today. I will pick a winner and announce the name on Monday, 11th July. Please leave your email id in the comments section so that I can get in touch with you. I will be able to ship only within India.....so the winner needs to provide an Indian address to which the book can be sent.

With over sixty traditional Andhra recipes in it, this book is written in a simple, easy to understand manner, and accompanied by beautiful pictures. Check out the sun dried rice flake fritters(aval vadam) that I made using the recipe from this book.
To win this book, you don't have to follow me or "like" me......though I am assuming that your being here and reading this means that you do like me. All that you have to do is leave a comment telling me why you think you should win this book.
The giveaway is open for a week from today. I will pick a winner and announce the name on Monday, 11th July. Please leave your email id in the comments section so that I can get in touch with you. I will be able to ship only within India.....so the winner needs to provide an Indian address to which the book can be sent.
Tuesday, July 05, 2011
Tomato-peanut chutney
For the final day of Blogging Marathon #6, I was paired with Pavani of Cook's Hideout, to cook something from her blog. The marathon finished a while back, but it is only now that I am getting down to posting what I made from her blog. This chutney is quick and easy to make, tastes good as soon as it is made and tastes even better the next day. Thank you, Pavani for the recipe.

What you need:
Tomato - 2
Peanuts - 1/2 cup
Red chillies - 3
Tamarind extract - from a gooseberry sized ball of tamarind
Salt
For tempering:
Oil - 1 tsp
Urad dal - 3/4 tsp
Mustard seeds - 3/4 tsp
Curry leaves - a few
Take the tomatoes in a microwave safe bowl. Add 1/4 cup of water, cover and microwave for 3-4 minutes until the tomatoes turn mushy. Let it cool.
Toss the peanuts and red chillies in 1/4 tsp of oil and microwave for 2 minutes. Let it cool.
Add salt,tamarind extract and grind the tomatoes, peanuts and red chillies to a smooth.
Heat the tempering ingredients. Once the mustard seeds pop, pour it over the chutney.
Serve with idli/dosa.
Don't forget to leave your comment on this post for a chance to win a copy of Cooking at home with Pedatha, an award winning cookbook.

What you need:
Tomato - 2
Peanuts - 1/2 cup
Red chillies - 3
Tamarind extract - from a gooseberry sized ball of tamarind
Salt
For tempering:
Oil - 1 tsp
Urad dal - 3/4 tsp
Mustard seeds - 3/4 tsp
Curry leaves - a few
Take the tomatoes in a microwave safe bowl. Add 1/4 cup of water, cover and microwave for 3-4 minutes until the tomatoes turn mushy. Let it cool.
Toss the peanuts and red chillies in 1/4 tsp of oil and microwave for 2 minutes. Let it cool.
Add salt,tamarind extract and grind the tomatoes, peanuts and red chillies to a smooth.
Heat the tempering ingredients. Once the mustard seeds pop, pour it over the chutney.
Serve with idli/dosa.
Don't forget to leave your comment on this post for a chance to win a copy of Cooking at home with Pedatha, an award winning cookbook.
Thursday, June 30, 2011
Event Announcement - Healthy Lunchbox Ideas-Paneer

Every parent will agree that packing a child's lunch box is no easy task. Variety, taste, appearance - these are just a few of the things that we have to consider before we decide what's to go into that box.
Kalyani has come up with an event called Healthy Lunch box Ideas which is a platform for us bloggers to brainstorm and come up with ways to make kids eat stuff that is good for them.
I will be guest hosting this event in July......and the theme for the month is Paneer.
So, put on your thinking....err....cooking caps and whip up something that uses paneer as the main ingredient, and can be packed as a healthy lunch box/snack box eat.
Now for the rules:
The event is on from July 1st to July 31st. Any entries you post within that period can be sent in.....archived posts are accepted too, as long as you link back to this announcement, the original announcement and include the logo in the post.
A link back to Kalyani's announcement, this announcement, and the use of the logo are mandatory.
Since we are talking healthy food, let's say NO to deep fried stuff.....though stir fried/grilled food is welcome.
Only vegetarian entries, please.....though I will accept eggs in baking.
Well, that's about it.....now grab some paneer and whatever else it is that you need to create magic in the kitchen and drop me a mail at luvgoodfood@gmail.com and let me know about it. Please include HLI-Paneer in the subject line.
Tuesday, June 28, 2011
Macaroni in creamy spinach sauce

What you need:
Macaroni - 1 cup
Spinach - 1 cup
Garlic - 8 cloves
Green chilli - 2 (adjust to taste)
Peanuts - a handful
Salt - to taste
Cheese(optional)
Oil - 1 tsp
Heat oil in a pan. Saute the garlic and spinach until the leaves start to wilt. Let it cool and then grind to a coarse paste along with the peanuts.
Take the macaroni in a pressure cooker. Add 1.5 cups of water to it. Stir in the spinach puree and salt. Close the pressure cooker, but do not put on the weight. When you see steam starting to come out of the vent in full force, wait for two minutes and then turn the heat to low. Let it cook for 6-8 minutes. Switch off heat. Top with grated cheese.
Enjoy!!!
Check out the Blogging Marathon page for the other Blogging Marathoners doing BM#6 hosted by Srivalli
Monday, June 27, 2011
Eggless oats cookies

Recipe source : Nirmala's kitchen
What you need:
Oats - 1.5 cups
Whole wheat flour - 1/2 cup
Raisins - 1/4 cup
Sugar - 1/4 cup
Baking soda - 1/2 tsp
Oil - 1/2 cup
Mix all the ingredients together to a soft dough. I had to add about 2-3 tbsp more of flour to get a smooth mixture. If you find the dough too dry, add a little milk while kneading.
Pinch out small balls of dough. Shape into round cookies and bake in a preheated oven at 200 degrees for 18-20 minutes or until the cookies start to brown on the edges.
This is my 5th post for the blogging marathon and my theme for the day is eggless baking.
Check out the Blogging Marathon page for the other Blogging Marathoners doing BM#6 hosted by Srivalli
Sunday, June 26, 2011
Masala paniyaram
Masala paniyarams make for a light breakfast or a hearty snack. They are an ideal way to use up the last few ladles of idli/dosa batter.

What you need:
Idli batter
Onion - 1, chopped fine
Green chillies - a few, minced
Carrot - 2, grated
Curry leaves and corriander leaves - some, chopped
Salt - to taste
Oil
Equipment needed:
A paniyaram pan/appakkarai/aebelskiver pan
Heat the paniyaram pan (check this post to see a picture of the pan). Put a few drops of oil in each depression. Half fill each depression with the batter. Let it cook on a medium flame until the bottom turns golden brown. Turn over and cook for a minute. Serve hot. These taste great by themselves, but you could serve with chutney or molaga podi.
This is my fourth post for BM#6 and the theme for the day is Mini bites.
Check out the Blogging Marathon page for the other Blogging Marathoners doing BM#6 hosted by Srivalli

What you need:
Idli batter
Onion - 1, chopped fine
Green chillies - a few, minced
Carrot - 2, grated
Curry leaves and corriander leaves - some, chopped
Salt - to taste
Oil
Equipment needed:
A paniyaram pan/appakkarai/aebelskiver pan
Heat the paniyaram pan (check this post to see a picture of the pan). Put a few drops of oil in each depression. Half fill each depression with the batter. Let it cook on a medium flame until the bottom turns golden brown. Turn over and cook for a minute. Serve hot. These taste great by themselves, but you could serve with chutney or molaga podi.
This is my fourth post for BM#6 and the theme for the day is Mini bites.
Check out the Blogging Marathon page for the other Blogging Marathoners doing BM#6 hosted by Srivalli
Friday, June 24, 2011
One bowl Cocoa bars
A while back, I won a giveaway held by Aparna. Aparna sent me a lovely book called Weeknight Desserts by Beatrice Ojakangas. It is full of simple,quick and delicious sweet treats.
This one bowl cocoa bar is from the book that she sent me. It is quick and super easy to whip up and tastes really good. My daughter who is a big fan of Cafe Coffee Day brownies said that this tastes just like that....and coming from a cake-a-holic, that is a H.U.G.E compliment.

What you need:
All purpose flour - 1.5 cups
Cocoa powder - 1/2 cup
Butter - 4 oz
Vanilla extract - 1 tsp
Egg - 1
Baking soda - 1/2 tsp
Sugar - 1 cup
Buttermilk - 3/4 cup
Mix all the ingredients in a large bowl until well blended. Preheat oven to 175 degrees. Pour the batter into a greased baking pan and bake for 30-35 minutes or until a toothpick inserted in the middle comes out clean. Cool and cut into squares.
There, didn't I say this was simple?
Enjoy!!!
This is my third post for BM#6 and the theme for the day is Shelf stable goodies for kids.
Check out the Blogging Marathon page for the other Blogging Marathoners doing BM#6 hosted by Srivalli
This one bowl cocoa bar is from the book that she sent me. It is quick and super easy to whip up and tastes really good. My daughter who is a big fan of Cafe Coffee Day brownies said that this tastes just like that....and coming from a cake-a-holic, that is a H.U.G.E compliment.

What you need:
All purpose flour - 1.5 cups
Cocoa powder - 1/2 cup
Butter - 4 oz
Vanilla extract - 1 tsp
Egg - 1
Baking soda - 1/2 tsp
Sugar - 1 cup
Buttermilk - 3/4 cup
Mix all the ingredients in a large bowl until well blended. Preheat oven to 175 degrees. Pour the batter into a greased baking pan and bake for 30-35 minutes or until a toothpick inserted in the middle comes out clean. Cool and cut into squares.
There, didn't I say this was simple?
Enjoy!!!
This is my third post for BM#6 and the theme for the day is Shelf stable goodies for kids.
Check out the Blogging Marathon page for the other Blogging Marathoners doing BM#6 hosted by Srivalli
Thursday, June 23, 2011
Sambar idli
For the second week of Blogging Marathon#6, I will be posting one theme a day. Today's theme is Regional Specials. Though there are still several Karnataka dishes that I would like to try out and post, this time, I am sticking to a popular dish from Tamilnadu.
Hotel Saravana Bhavan is famous for its 14 idli. This is nothing but 14 tiny idlis dunked in sambar. Ratna Cafe's sambar idli is something people can't stop talking about once they have tasted it. A saucepan shaped (and sized) container full of their signature sambar in which the idlis soak until you dig into them - is it any wonder people keep going back for more of it?
Today, I have for you, my version of this popular restaurant dish.
For the idli batter:
Par boiled rice - 4 cups
Urad dal - 1 cup
Methi seeds - 1 tbsp
Salt and water - as needed
Soak the rice and dal separately. Add the methi seeds to the dal while soaking. Refrigerate the dal after soaking for an hour until you are ready to grind the batter. The rice needs to be soaked for 10-12 hours. Grind the dal first along with the cold water in which it has been soaking, until it is creamy. Add the soaked rice to it little by little until you have a smooth, thick batter. Add salt and mix well. Leave this to ferment overnight.
For the sambar:
Onion - 1, chopped fine
Tomato - 1, chopped
Tuar dal - 1/2 cup, cooked with 1/2 tsp of turmeric powder and mashed
Tamarind - extract from a lemon sized ball
coconut - 1/4 cup, grated
Oil - 1 tsp
Dhania/corriander seeds - 2 tsp
Chana dal - 2 tsp
Urad dal - 2 tsp
Red chillies - 4 (adjust to taste)
Fry the last four ingredients in a tsp of oil until the dals turn reddish brown. Grind along with the grated coconut, adding sufficient water to make a smooth paste.
Heat a tsp of oil. Saute onions until pink. Add the tamarind extract, ground paste, cooked dal, salt and diced tomatoes. Let it boil until the raw smell goes away (10-15 minutes). Add water if you feel the sambar is too thick. Garnish with curry leaves and corriander leaves. Pour a tempering of mustard seeds(mustard seeds poppped in a tsp of oil) over this.
To make sambar idlis:
To make these the authentic way, you need a special, small sized idli mould. Each depression can hold about a tsp of batter. If you don't have it, the regular idli mould will work, but it looks much better if you make these small in size.
Grease the mould well and pour a tsp of batter into each depression.

Steam for 10-12 minutes until done.
Now take about 8 of these idlis in a small bowl. Pour a generous helping of hot sambar over it There should be enough sambar to cover all the idlis and then some more. Let it soak for about 5 minutes and then serve. If you find that the idlis have absorbed the sambar, pour some more sambar over it just before you serve.

Check out the Blogging Marathon page for the other Blogging Marathoners doing BM#6 hosted by Srivalli
This goes to Champa who is hosting Kids' Delight -Mini bites, an event started by Srivalli.
Hotel Saravana Bhavan is famous for its 14 idli. This is nothing but 14 tiny idlis dunked in sambar. Ratna Cafe's sambar idli is something people can't stop talking about once they have tasted it. A saucepan shaped (and sized) container full of their signature sambar in which the idlis soak until you dig into them - is it any wonder people keep going back for more of it?
Today, I have for you, my version of this popular restaurant dish.
For the idli batter:
Par boiled rice - 4 cups
Urad dal - 1 cup
Methi seeds - 1 tbsp
Salt and water - as needed
Soak the rice and dal separately. Add the methi seeds to the dal while soaking. Refrigerate the dal after soaking for an hour until you are ready to grind the batter. The rice needs to be soaked for 10-12 hours. Grind the dal first along with the cold water in which it has been soaking, until it is creamy. Add the soaked rice to it little by little until you have a smooth, thick batter. Add salt and mix well. Leave this to ferment overnight.
For the sambar:
Onion - 1, chopped fine
Tomato - 1, chopped
Tuar dal - 1/2 cup, cooked with 1/2 tsp of turmeric powder and mashed
Tamarind - extract from a lemon sized ball
coconut - 1/4 cup, grated
Oil - 1 tsp
Dhania/corriander seeds - 2 tsp
Chana dal - 2 tsp
Urad dal - 2 tsp
Red chillies - 4 (adjust to taste)
Fry the last four ingredients in a tsp of oil until the dals turn reddish brown. Grind along with the grated coconut, adding sufficient water to make a smooth paste.
Heat a tsp of oil. Saute onions until pink. Add the tamarind extract, ground paste, cooked dal, salt and diced tomatoes. Let it boil until the raw smell goes away (10-15 minutes). Add water if you feel the sambar is too thick. Garnish with curry leaves and corriander leaves. Pour a tempering of mustard seeds(mustard seeds poppped in a tsp of oil) over this.
To make sambar idlis:
To make these the authentic way, you need a special, small sized idli mould. Each depression can hold about a tsp of batter. If you don't have it, the regular idli mould will work, but it looks much better if you make these small in size.
Grease the mould well and pour a tsp of batter into each depression.

Steam for 10-12 minutes until done.
Now take about 8 of these idlis in a small bowl. Pour a generous helping of hot sambar over it There should be enough sambar to cover all the idlis and then some more. Let it soak for about 5 minutes and then serve. If you find that the idlis have absorbed the sambar, pour some more sambar over it just before you serve.

Check out the Blogging Marathon page for the other Blogging Marathoners doing BM#6 hosted by Srivalli
This goes to Champa who is hosting Kids' Delight -Mini bites, an event started by Srivalli.
Iyengar bakery style stuffed potato buns

These buns are fresh off the oven. I just made these, ate one.....have a plate with another one on my side.....and am typing out this recipe as I take generous bites. These are seriously so soft,so good and so tasty......just like you would get at any of the Iyengar bakeries in Bangalore. I have decided that whenever the craving for these strikes, I am making them at home, and not buying them. They are that good.
Before I tell you again how good they are, I must thank Lata for giving me this recipe, and also for being kind enough to convert the recipe from measurements in grams to cups. Thank you, Lata.
Before I start raving about how good these are AGAIN, let us get to the recipe.
What you need:
Maida/All purpose flour - 2 cups, heaped
Active dry yeast - 1 tbsp
Salt - 1 tsp
Sugar - 3 tbsp
Milk - 2/3 cups
Softened butter - 2 tbsp (heaped)
Vanaspati/Vegetable shortening - 1 tbsp
Curd/Yogurt - 1 tbsp
For the masala/stuffing:
Potato - 3 small, cooked, peeled and mashed
Carrot - 2 small, cooked and mashed
Onion - 1, chopped fine
Turmeric powder - 1/2 tsp
Oil - 1 tbsp
Garam masala - 1/4 tsp
Corriander leaves - a little, chopped fine
Heat oil in a pan. Add the onions and saute till they begin to brown. Add turmeric powder, mashed vegetables, garam masala and salt. Add 1/4 cup of water. Stir well and then heat until moisture evaporates completely and the masala comes together. Garnish with corriander leaves and keep aside.
To make buns:
Take the maida,salt and sugar(keep aside a tsp for proofing yeast)in a large mixing bowl. Add a tsp of sugar and a little lukewarm milk to the yeast. Keep it covered until it starts to bubble. Make a well in the centre of the flour and pour the yeast in. Mix in butter, vegetable shortening, milk and yogurt. Knead to a soft, pliable dough. Keep covered until it doubles in volume. This take about an hour and a half. Punch down and divide the dough into eight equal balls. Divide the prepared masala into 8 balls that are half the size of the dough balls. I had some left over masala which was tasty enough to eat on its own. Now, take one ball of dough in your hand and flatten it into a circle. The dough has enough butter in it to not stick to your hands. Place the masala ball in the centre and then pull the sides to close the masala. Flatten and smooth into a circle again. Place it in a greased baking tray with the closed side facing down.
Cover with a wet towel and set aside for 15-20 minutes for it to rise again. Meanwhile, preheat your oven to 175 degrees. All my baking is done in a convection microwave oven. I do not have a preheat function in my oven....so usually I just turn it on for 10 minutes at 175 degrees and that does the trick.
Just before baking, apply an egg wash to the top of each bun. To prepare egg wash, lightly beat an egg, along with a tbsp of water and then brush it over the top of the buns. Bake for 20-22 minutes or until the top turns a nice brown and the centre, when touched, has a nice spring to it.
Eat hot off the oven, or warm up and serve later.

This is my first post for Blogging Marathon#6 week 2, under the category picnic food.
Check out the Blogging Marathon page for the other Blogging Marathoners doing BM#6 hosted by Srivalli
Tuesday, June 21, 2011
Bisi bele baath with broken wheat
The last day of Blogging Marathon #6, Week 1, sees me paired with Srivalli, and cooking a Karnataka dish from her blog. I have chosen to make Bisi Bele Baath, a signature dish of Karnataka. I have made some major changes, though, by doing away with the main ingredient - rice. I have wanted to make this dish with Broken wheat ever since I ate it that way at a restaurant.

What you need:
Broken wheat - 1 cup
Tuar dal - 1/2 cup
Tamarind - extract from a lemon sized ball
Water - 6 cups (Water +tamarind extract should total six cups)
Salt - to taste
Vegetables - 1 cup (I used potatoes,carrots,beans and green peas)
Onion - 1, chopped fine
Tomato - 1, chopped fine
Oil - 2 tsp
For masala powder:
Chana dal - 2 tsp
Urad dal - 1 tsp
Cinnamon - 4 one inch sticks
Clove - 4 or 5
Cardamom - 4
Methi seeds - 1/4 tsp
Corriander seeds - 1/4 cup
Dry red chillies - 4 or 5(adjust to taste)
Curry leaves - a few
Heat a tsp of oil. Fry the dals first and when they turn reddish brown, add in the other ingredients and fry till aromatic. Cool and then powder.
For tempering:
Oil(gingely) - 1 tsp
Mustard seeds - 1 tsp
Groundnuts - a handful
Heat together until the mustard seeds pop and the groundnuts start to brown.
Heat 2 tsp of oil in a pressure cooker. Saute the onions till they turn pink. Now add tomatoes and fry till mushy. Stir in the diced vegetables and turmeric powder. Mix well and heat for about 2-3 minutes. Add the broken wheat and mix again. After a minute, stir in the tuar dal,tamarind extract, water,salt, and powdered masala. Cook until two whistles and then reduce the heat to minimum and cook for a further ten minutes. Once the steam has settled down, pour the tempering over the cooked bisi bele and mix well.
The bisi bele will be very watery when you open the cooker, but you will find that it thickens as it cools down.
Serve with raita and papad.
Do take a look at what my fellow marathoners are up to.
This goes to Kalyani who is hosting MMK-One Pot Meals.

What you need:
Broken wheat - 1 cup
Tuar dal - 1/2 cup
Tamarind - extract from a lemon sized ball
Water - 6 cups (Water +tamarind extract should total six cups)
Salt - to taste
Vegetables - 1 cup (I used potatoes,carrots,beans and green peas)
Onion - 1, chopped fine
Tomato - 1, chopped fine
Oil - 2 tsp
For masala powder:
Chana dal - 2 tsp
Urad dal - 1 tsp
Cinnamon - 4 one inch sticks
Clove - 4 or 5
Cardamom - 4
Methi seeds - 1/4 tsp
Corriander seeds - 1/4 cup
Dry red chillies - 4 or 5(adjust to taste)
Curry leaves - a few
Heat a tsp of oil. Fry the dals first and when they turn reddish brown, add in the other ingredients and fry till aromatic. Cool and then powder.
For tempering:
Oil(gingely) - 1 tsp
Mustard seeds - 1 tsp
Groundnuts - a handful
Heat together until the mustard seeds pop and the groundnuts start to brown.
Heat 2 tsp of oil in a pressure cooker. Saute the onions till they turn pink. Now add tomatoes and fry till mushy. Stir in the diced vegetables and turmeric powder. Mix well and heat for about 2-3 minutes. Add the broken wheat and mix again. After a minute, stir in the tuar dal,tamarind extract, water,salt, and powdered masala. Cook until two whistles and then reduce the heat to minimum and cook for a further ten minutes. Once the steam has settled down, pour the tempering over the cooked bisi bele and mix well.
The bisi bele will be very watery when you open the cooker, but you will find that it thickens as it cools down.
Serve with raita and papad.
Do take a look at what my fellow marathoners are up to.
This goes to Kalyani who is hosting MMK-One Pot Meals.
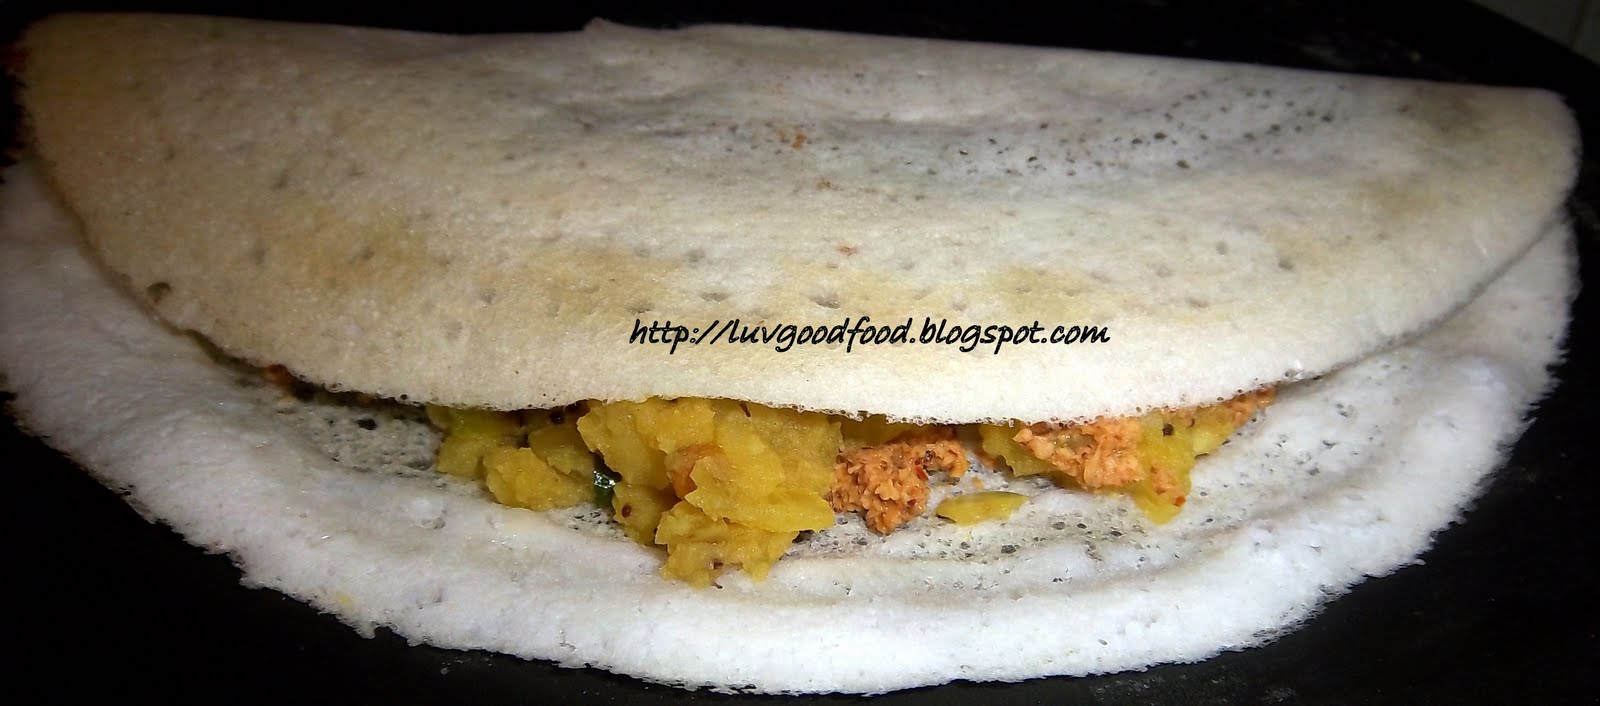
Mysore masala dosa
Paper thin, crisp dosas with hot potato masala and a spicy red chutney for filling......that doesn't even begin to describe the explosion of taste that you experience when you bite into the Mysore Masala dosa.

What you need:
For the batter:
Idli rice - 4 cups
Whole urad dal - 1 cup
Fenugreek seeds/methi - 1 tbsp, heaped
Salt to taste
Soak the rice and dal separately. Add the methi to the urad dal while soaking. Most people add methi to the rice, but I find that it gets ground better if it is soaked with the dal, as dal is ground for a longer time. After an hour of soaking, refrigerate the dal until you are ready to grind. This makes the urad dal batter very creamy. The rice has to be soaked for atleast 8-10 hours.
Grind the urad dal along with the cold water until it turns soft and creamy. This takes roughly 25-30 minutes.Add the soaked rice to this. Add water only if necessary. Add salt and grind well.....another 15-20 minutes.
Let this ferment overnight.
For the red chutney:(Recipe from Ramya's Mane Adige)

Urad dal - 2 tsp
Chana dal - 2 tsp
Red chilli - 4 (adjust to taste)
Coconut - 1/4 cup
Salt - to taste
Heat a teaspoon of oil. Fry the dals and red chillies till reddish brown. Once it cools, grind it along with the coconut and salt to a smooth paste, adding as little water as possible.
For the masala:

Potato - 3, medium sized, cooked, peeled and mashed well
Onion - 2, chopped fine
Green chilli - 2, minced
Ginger - a one inch piece, julienned
Curry leaves - few, chopped fine
Corrinader leaves - to garnish
Urad dal - 1/2 tsp
Chana dal - 1/2 tsp
Mustard seeds - 1/2 tsp
Oil - 1 tsp
Salt - to taste
Turmeric powder - 1/2 tsp
Heat oil. Add chana dal, urad dal and mustard seeds. When the seeds pop, add green chillies, curry leaves,ginger and onions. Fry well on low flame till the onions start to brown. Add the mashed potatoes,turmeric powder and salt. Stir well and mix in a cup of water. Let this boil until the mixture thickens and all the moisture is absorbed. Switch off heat. Garnish with corriander leaves and squeeze some lemon juice over this. Mix well.
To make dosa:
Spread batter in a thin circle on a tava. Drizzle some oil over it. This dosa is cooked only on one side...do not turn it over.

When the bottom starts to turn brown, spread some red chutney over half of the dosa and put some masala over it.

Fold the other half over this and serve hot off the tava with coconut chutney and sambar.

Do check out what my fellow marathoners are up to.

What you need:
For the batter:
Idli rice - 4 cups
Whole urad dal - 1 cup
Fenugreek seeds/methi - 1 tbsp, heaped
Salt to taste
Soak the rice and dal separately. Add the methi to the urad dal while soaking. Most people add methi to the rice, but I find that it gets ground better if it is soaked with the dal, as dal is ground for a longer time. After an hour of soaking, refrigerate the dal until you are ready to grind. This makes the urad dal batter very creamy. The rice has to be soaked for atleast 8-10 hours.
Grind the urad dal along with the cold water until it turns soft and creamy. This takes roughly 25-30 minutes.Add the soaked rice to this. Add water only if necessary. Add salt and grind well.....another 15-20 minutes.
Let this ferment overnight.
For the red chutney:(Recipe from Ramya's Mane Adige)

Urad dal - 2 tsp
Chana dal - 2 tsp
Red chilli - 4 (adjust to taste)
Coconut - 1/4 cup
Salt - to taste
Heat a teaspoon of oil. Fry the dals and red chillies till reddish brown. Once it cools, grind it along with the coconut and salt to a smooth paste, adding as little water as possible.
For the masala:

Potato - 3, medium sized, cooked, peeled and mashed well
Onion - 2, chopped fine
Green chilli - 2, minced
Ginger - a one inch piece, julienned
Curry leaves - few, chopped fine
Corrinader leaves - to garnish
Urad dal - 1/2 tsp
Chana dal - 1/2 tsp
Mustard seeds - 1/2 tsp
Oil - 1 tsp
Salt - to taste
Turmeric powder - 1/2 tsp
Heat oil. Add chana dal, urad dal and mustard seeds. When the seeds pop, add green chillies, curry leaves,ginger and onions. Fry well on low flame till the onions start to brown. Add the mashed potatoes,turmeric powder and salt. Stir well and mix in a cup of water. Let this boil until the mixture thickens and all the moisture is absorbed. Switch off heat. Garnish with corriander leaves and squeeze some lemon juice over this. Mix well.
To make dosa:
Spread batter in a thin circle on a tava. Drizzle some oil over it. This dosa is cooked only on one side...do not turn it over.

When the bottom starts to turn brown, spread some red chutney over half of the dosa and put some masala over it.

Fold the other half over this and serve hot off the tava with coconut chutney and sambar.
Do check out what my fellow marathoners are up to.
Sunday, June 19, 2011
Mangalore bonda - Golibaje
The first time I had mangalore bondas is at Matsya, a restaurant in T.Nagar, Chennai. These small, light and fluffy deep fried balls of flour disappeared almost as soon as they arrived at our table and since then, I have never missed a chance to order these when I visit that restaurant.
Blogging Marathon 6 gave me a chance to try my hand at making this snack at home. The recipe is from Ramya's Mane Adige. Thank you, Ramya, for helping me recreate a restaurant favourite at home.

What you need:
Maida - 1 cup, heaped
Curd - 1/2 cup
Salt - to taste
Green chillies - 2, minced
Corriander - a little, finely chopped
Ginger - a small piece, julienned
Cooking soda - 1/4 tsp
Oil - for deep frying
Mix all the ingredients in a large mixing bowl. Don't add all the curd at one go. Add it little by little and keep mixing until you get a dough that is of dropping consistency. I added a few more teaspoons of curd in addition to the half cup listed above to get the right consistency. The batter will be sticky. So dip your hands in some water and pinch out small gooseberry sized balls of dough and gently slide them into hot oil. Deep fry until brown on both sides.
Enjoy with coconut chutney or ketchup.
What I think of the dish:
This is an easy snack to whip up and it tastes really, really good. These can be quite addictive and it is difficult to stop eating them once you get started. The bondas turned out to be very light and crisp and were not too oily despite being deep fried.
Do take a look at what my fellow marathoners are up to.
This goes to Champa who is hosting Kids' Delight -Mini bites, an event started by Srivalli.
Blogging Marathon 6 gave me a chance to try my hand at making this snack at home. The recipe is from Ramya's Mane Adige. Thank you, Ramya, for helping me recreate a restaurant favourite at home.

What you need:
Maida - 1 cup, heaped
Curd - 1/2 cup
Salt - to taste
Green chillies - 2, minced
Corriander - a little, finely chopped
Ginger - a small piece, julienned
Cooking soda - 1/4 tsp
Oil - for deep frying
Mix all the ingredients in a large mixing bowl. Don't add all the curd at one go. Add it little by little and keep mixing until you get a dough that is of dropping consistency. I added a few more teaspoons of curd in addition to the half cup listed above to get the right consistency. The batter will be sticky. So dip your hands in some water and pinch out small gooseberry sized balls of dough and gently slide them into hot oil. Deep fry until brown on both sides.
Enjoy with coconut chutney or ketchup.
What I think of the dish:
This is an easy snack to whip up and it tastes really, really good. These can be quite addictive and it is difficult to stop eating them once you get started. The bondas turned out to be very light and crisp and were not too oily despite being deep fried.
Do take a look at what my fellow marathoners are up to.
This goes to Champa who is hosting Kids' Delight -Mini bites, an event started by Srivalli.
Akki rotti - Rice flour rotis
I have eaten akki rotti exactly twice before this - once at Mahamudra, a restaurant in Chennai (read my review here) and then during a recent trip to Coorg when I had to specifically ask the cook to make this Coorgi speciality for me. If I hadn't asked, I am sure I would have ended up eating something inane like toast and butter, which the cook served anyway because there were many other people who were interested in eating just that.

Making akki rotti at home is not a very difficult task, though making it in a kadai is time consuming mainly because you have to let the kadai cool each time before you make the next one. I slightly quickened this process by running cold water over the kadai after making each rotti. It still was a time consuming process and I think patting it out on a plastic sheet and then cooking it on a tawa would have considerably speeded things up.
The source of this recipe is a friend who was helpful to the extent of showing me what consistency the dough should be and gave me a list of all the ingredients I could add. Thank you R.
I have also been guided by the akki rotti recipe at Ruchii, the pics on which blog helped me understand what the final product should look like.
What you need:
Rice flour - 2 cups
Water - 2 cups
Salt - to taste
Carrots - 2, grated
Asafoetida - a little
Sprouted green gram - a handful
Onion - 1 large, finely chopped
Corriander - some, chopped fine
Green chillies - 2 or 3, minced
Take all the ingredients except water in a large bowl. Mix well.
Bring water to a rolling boil. Add it little by little to the flour and mix well with a spatula until it becomes a smooth dough. Even though I boiled 2 cups of water, I used only about a cup and a quarter. The amount of water used will depend on the quality of the flour. Cover and keep aside until it becomes warm enough to handle. Mix in 2 tsp of oil and knead well.
Pinch out a ball of dough. Pat it onto the kadai, spreading it thin with your hands. Drizzle a little oil over it and then cook covered on medium heat until done. You will know that it is done when the under side becomes crisp and brown, and the top turns from white to a creamish colour.
Serve hot, as it tends to turn hard when it cools down.

I served it with a spicy tomato chutney.
Do take a look at what my fellow marathoners are up to.

Making akki rotti at home is not a very difficult task, though making it in a kadai is time consuming mainly because you have to let the kadai cool each time before you make the next one. I slightly quickened this process by running cold water over the kadai after making each rotti. It still was a time consuming process and I think patting it out on a plastic sheet and then cooking it on a tawa would have considerably speeded things up.
The source of this recipe is a friend who was helpful to the extent of showing me what consistency the dough should be and gave me a list of all the ingredients I could add. Thank you R.
I have also been guided by the akki rotti recipe at Ruchii, the pics on which blog helped me understand what the final product should look like.
What you need:
Rice flour - 2 cups
Water - 2 cups
Salt - to taste
Carrots - 2, grated
Asafoetida - a little
Sprouted green gram - a handful
Onion - 1 large, finely chopped
Corriander - some, chopped fine
Green chillies - 2 or 3, minced
Take all the ingredients except water in a large bowl. Mix well.
Bring water to a rolling boil. Add it little by little to the flour and mix well with a spatula until it becomes a smooth dough. Even though I boiled 2 cups of water, I used only about a cup and a quarter. The amount of water used will depend on the quality of the flour. Cover and keep aside until it becomes warm enough to handle. Mix in 2 tsp of oil and knead well.
Pinch out a ball of dough. Pat it onto the kadai, spreading it thin with your hands. Drizzle a little oil over it and then cook covered on medium heat until done. You will know that it is done when the under side becomes crisp and brown, and the top turns from white to a creamish colour.
Serve hot, as it tends to turn hard when it cools down.

I served it with a spicy tomato chutney.
Do take a look at what my fellow marathoners are up to.
Saturday, June 18, 2011
Mysore Rasam
Much as I love a good, tangy rasam, I don't find myself making it often. I usually make it only when one of us falls ill. This time round, I made rasam just because I wanted to (The fact that I have chosen to showcase dishes from Karnataka for the blogging marathon does have a small bearing on this)and not as a cure for illness.
The recipe is from Mallika Badrinath's Classic Lunch Recipes.

What you need:
Tuar dal - 1/2 cup
Tamarind - a lemon sized ball soaked in water
Corriander seeds/dhania - 2 tsp
Black peppercorns - 10
Red chillies - 3
Cumin seeds/jeera - 1 tsp
Garlic - 8 pods
Turmeric powder - 1/4 tsp
Salt - to taste
Jaggery - a small piece
Curry leaves - a few
Add cumin,dhania,peppercorns, broken red chillies,garlic and turmeric powder to the dal. Add just enough water to cover it and cook until one whistle.
Let it cool. Drain off excess water(don't throw it away.....keep it aside) and grind the cooked dal to a coarse paste.
Add enough water to the soaked tamarind to make about 2.5 cups of thin tamarind extract. Add the ground dal, water in which dal was cooked,salt and jaggery to this. Crush the curry leaves with your hands and mix it in. Let it boil for about 10-12 minutes until the flavours are well blended.
Serve hot with rice.
Do take a look at what my fellow marathoners are up to.
The recipe is from Mallika Badrinath's Classic Lunch Recipes.

What you need:
Tuar dal - 1/2 cup
Tamarind - a lemon sized ball soaked in water
Corriander seeds/dhania - 2 tsp
Black peppercorns - 10
Red chillies - 3
Cumin seeds/jeera - 1 tsp
Garlic - 8 pods
Turmeric powder - 1/4 tsp
Salt - to taste
Jaggery - a small piece
Curry leaves - a few
Add cumin,dhania,peppercorns, broken red chillies,garlic and turmeric powder to the dal. Add just enough water to cover it and cook until one whistle.
Let it cool. Drain off excess water(don't throw it away.....keep it aside) and grind the cooked dal to a coarse paste.
Add enough water to the soaked tamarind to make about 2.5 cups of thin tamarind extract. Add the ground dal, water in which dal was cooked,salt and jaggery to this. Crush the curry leaves with your hands and mix it in. Let it boil for about 10-12 minutes until the flavours are well blended.
Serve hot with rice.
Do take a look at what my fellow marathoners are up to.
Friday, June 17, 2011
Maddur vade - a deep fried crunchy snack
For the longest time ever, I was firm on the fact that I would NEVER make maddur vade. Why? Because I had always thought of it as Madura vada.....which literally translates into sweet vada....and the idea of making a vada that is sweet somehow never appealed to me. All this was before I learned that it is actually Maddur vade, and that Maddur is the name of a place in Karnataka and that it is famous for these vadas. A google search threw up several recipes. I narrowed down on this recipe at Chitra Amma's Kitchen.

What you need:
Rava/sooji/semolina - 1/2 cup
Maida - 1 tbsp
Rice flour - 3 tbsp
Onion - 2, medium sized
Salt - to taste
Green chillies - 2 or 3 (adjust to taste)
Curry leaves - a few
Corriander leaves - a little
Hot oil - 1 tbsp
Oil - for deep frying
Coarsely grind the chillies, curry leaves and corriander in the mixie. Do not grind it too fine. The aim is only to crush these ingredients a little. Alternately, you could chop them really fine.
Transfer this to a large mixing bowl, and add the onions,rava,maida, rice flour and salt. Mix well. Pour hot oil over this and blend with a spoon.
Sprinkle water little by little and knead to a firm, soft dough. Take care to not add too much water.
Heat oil in a kadai. Pinch out small balls of the dough. Flatten slightly between your palms and deep fry until brown on both sides.
I made these slightly smaller and thicker than the pictures in the original recipe indicate. This was done intentionally, as I thought smaller vadas would appeal to the little girl and her friend.
What I think of the dish:
This is a great snack. I just wish I hadn't waited this long to try it out. The quantities given here make 12 vades and these got polished off in almost no time at all. This is something I will be making again.....and again.....and again. The vada tastes wonderful by itself, though it can also be eaten with ketchup or chutney.
Thank you Dibs for sharing this recipe.
This goes to Champa who is hosting Kids' delight - mini bites, an event started by Srivalli.
Do take a look at my fellow marathoners to see what they are up to.

What you need:
Rava/sooji/semolina - 1/2 cup
Maida - 1 tbsp
Rice flour - 3 tbsp
Onion - 2, medium sized
Salt - to taste
Green chillies - 2 or 3 (adjust to taste)
Curry leaves - a few
Corriander leaves - a little
Hot oil - 1 tbsp
Oil - for deep frying
Coarsely grind the chillies, curry leaves and corriander in the mixie. Do not grind it too fine. The aim is only to crush these ingredients a little. Alternately, you could chop them really fine.
Transfer this to a large mixing bowl, and add the onions,rava,maida, rice flour and salt. Mix well. Pour hot oil over this and blend with a spoon.
Sprinkle water little by little and knead to a firm, soft dough. Take care to not add too much water.
Heat oil in a kadai. Pinch out small balls of the dough. Flatten slightly between your palms and deep fry until brown on both sides.
I made these slightly smaller and thicker than the pictures in the original recipe indicate. This was done intentionally, as I thought smaller vadas would appeal to the little girl and her friend.
What I think of the dish:
This is a great snack. I just wish I hadn't waited this long to try it out. The quantities given here make 12 vades and these got polished off in almost no time at all. This is something I will be making again.....and again.....and again. The vada tastes wonderful by itself, though it can also be eaten with ketchup or chutney.
Thank you Dibs for sharing this recipe.
This goes to Champa who is hosting Kids' delight - mini bites, an event started by Srivalli.
Do take a look at my fellow marathoners to see what they are up to.
Subscribe to:
Posts (Atom)